How to Change the Administrator on Windows 10
Содержание
- How To Change The Administrator On Windows 10
- How To Change The Administrator On Windows 10
- How To Change Windows 10 Administrator Using Settings
- How To Change The Administrator On Windows 10 Using Control Panel
- How To Change Windows 10 Administrator Using User Accounts
- How To Change The Administrator On Windows 10 Using PowerShell
- How To Change The Administrator On Windows 10 Using Command Prompt
- Create a Local Administrator Account In Windows 10
- How To Change Administrator In Windows 10?
- Possible Reasons Why You Want To Change The Administrator In Your Windows 10 PC
- How To Change Administrator In Windows 10?
- 1# User Account Control To Change Administrator In Windows 10
- 2# Change Administrator Windows 10 By Using Local User & Group Management Tool
- How to change a Windows 10 user account type and why you might want to
- How to change user account type using Settings
- How to change user account type using User Accounts
- How to change user account type using Control Panel
- How to change user account type using PowerShell
- How to change user account type using Command Prompt
- More Windows 10 resources
- Expect new content for Age of Empires 2 and 3 Definitive Editions soon
- Age of Empires 4 devs talk about their vision of a true Age 2 successor
- Review: HP ENVY 14 brings premium features to a fantastic creator's laptop
- These are the best PC sticks when you're on the move
- How to Change Administrator Name on Windows 10
- How to Change Administrator Name on Windows 10 from Computer Management
- How to Change Administrator Name on Windows 10 with Command Prompt
- How to Change Administrator Name on Windows 10 with PowerShell
- How to Change Administrator Name on Windows 10 with Group Policy
- How to Change the Administrator Name in Windows 10
- Rename your Microsoft admin login name
- What to Know
- Local Security Policy
- Computer Management
- Command Prompt
- Control Panel
- Why Change the Administrator Account Name?
How To Change The Administrator On Windows 10
We show you 5 different ways
Windows 10 has the Standard user account and the Administrator account, each with different privileges to use a device and applications.
An administrator account offers complete system control with privileges such as access to all files on the device. You can also modify other user accounts and change them to Standard or Administrator, install software and hardware, change security settings, and execute elevated tasks.
However, if you got locked out of your computer, forgot your administrator password, or your admin rights were accidentally revoked, you can't make any changes on the device.

The Standard user account on the other hand is more restrictive. Standard users can work with apps and change settings that won't affect other user accounts. Unlike administrators, Standard users cannot install new apps. Plus, if they have to execute an elevated task, they'll need administrative credentials to complete it.
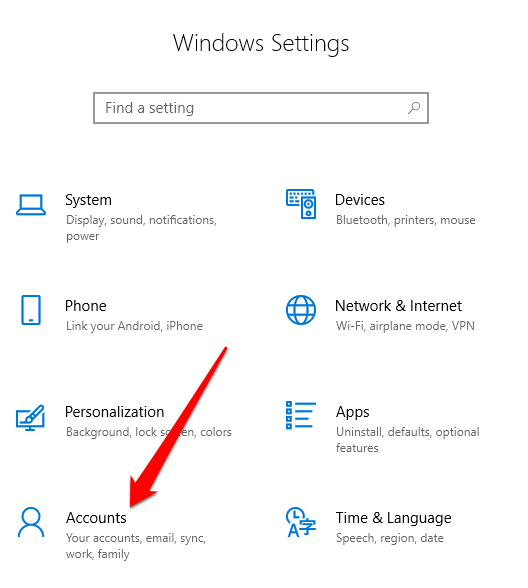
There are different reasons why you may want to change the administrator on Windows 10. For example, if you're handing over the device to someone else, or you want to add someone else as an administrator and become a Standard user yourself. Windows 10 includes different ways for you to change the administrator, which we'll explain in this guide.
How To Change The Administrator On Windows 10
There are five different ways to change the administrator on Windows 10. You can use:
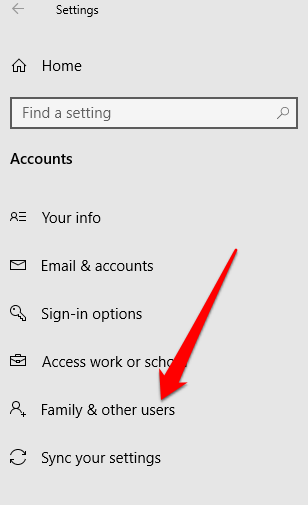
How To Change Windows 10 Administrator Using Settings
How To Change The Administrator On Windows 10 Using Control Panel
How To Change Windows 10 Administrator Using User Accounts
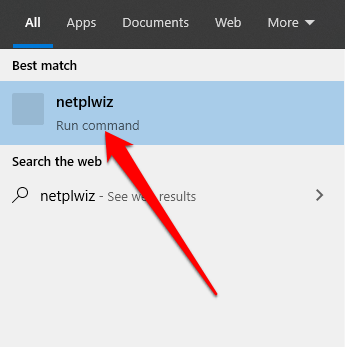
You can set an account to Administrator type using the netplwiz command or User Accounts.
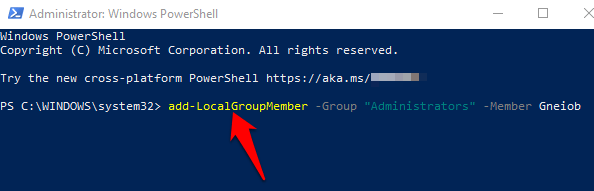
How To Change The Administrator On Windows 10 Using PowerShell
PowerShell is a command line shell that allows system administrators to automate tasks like creating new users, passwords, and more so that they don't have to waste time on such mundane things (read more in our guide on Using PowerShell For Home Users).
Note: Replace "Account-Name" with the actual name of the account you're changing to administrator.
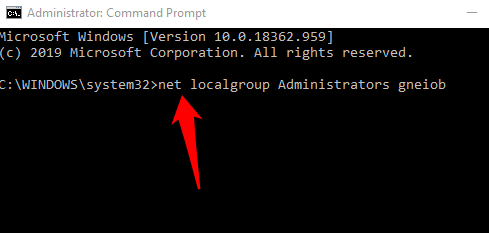
How To Change The Administrator On Windows 10 Using Command Prompt
Note: Remember to replace "Account-Name" with the actual name of the account you're changing to administrator.
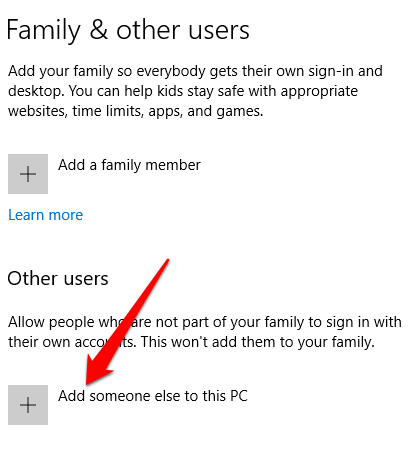
Create a Local Administrator Account In Windows 10
You can also create a local user or administrator account in Windows 10 and give it administrator permissions. Users of Windows 10 version 1803 and later can add security questions, which allows them to reset their local account passwords anytime.
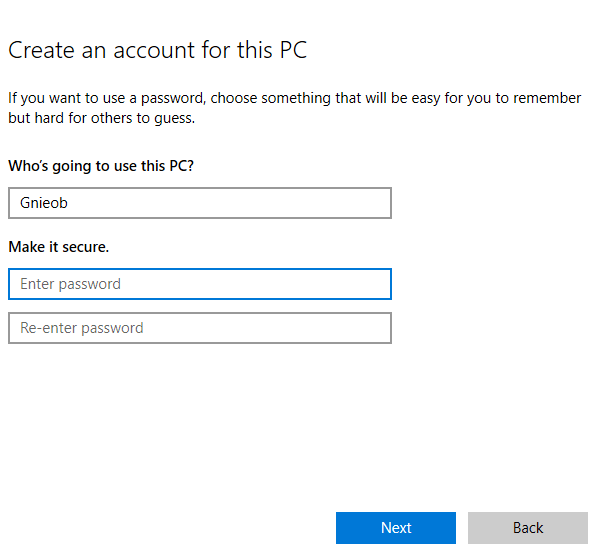
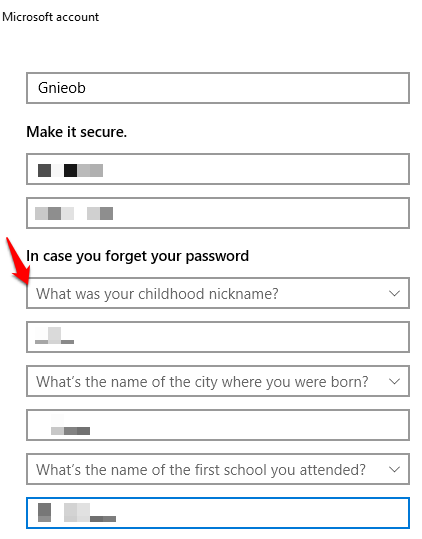
Enter a username and password, and type a password hint or select security questions. Click Next once you're done, and then use any of the methods above to change the user account to an administrator.
Were you able to change the administrator on your Windows 10? Let us know in the comments.
Elsie is a technology writer and editor with a special focus on Windows, Android and iOS. She writes about software, electronics and other tech subjects, her ultimate goal being to help people out with useful solutions to their daily tech issues in a simple, straightforward and unbiased style. She has a BCom degree in Marketing and currently pursuing her Masters in Communications and New Media. Read Elsie's Full Bio
Источник
How To Change Administrator In Windows 10?
How to change administrator in Windows 10: In this step-by-step guide I will show you exactly what you can do to change administrator in Windows 10. In every operating system there are Windows administrators, and then there are Windows standard users.
The Windows administrators have all the special privileges and the normal users lack those special privileges. For example, Administrators can install or uninstall software on the system or change the system properties.
The Windows admin can also change settings of other accounts. But standard users are restricted to do these operations. So if you are not the Administrator of your system you can't even change the administrator in Windows 10.

There are different ways to accomplish this task and I will list them all in detail so that you do not make any mistakes and break your computer.
The methods listed below are the easiest anyone with zero technical knowledge can perform those instructions. If in case you are stuck somewhere and do not know what to do, just don't rush and drop a comment and I will try to help you with your issue.
Possible Reasons Why You Want To Change The Administrator In Your Windows 10 PC
Whatever your reason is the solution is provided with in-depth detail and clarity.
How To Change Administrator In Windows 10?
In this guide on How To Change Administrator In Windows 10, I will show you two ways by which you can do the needful.
1# User Account Control To Change Administrator In Windows 10
Let's see how you can change administrator account by this method. For your better understanding, I am also including screenshots.
Changing Administrator account Windows 10 through User Account Settings:


That's it how it works. Now let us see How To Change Administrator In Windows 10 using Local User and Group Management tool.
2# Change Administrator Windows 10 By Using Local User & Group Management Tool


Источник
How to change a Windows 10 user account type and why you might want to
 Source: Windows Central
On Windows 10, you have two main account types for users, including Administrator and Standard User, each one offering a different set of privileges to use a device and apps. The Administrator type provides complete system control, which means that users can change settings globally, install apps, execute elevated tasks, and perform pretty much anything.
In comparison, the Standard User account type is more restrictive. Users with the standard account can work with apps, but they can't install new applications. They can change settings, but only those that won't affect other accounts, which means that global system configurations aren't allowed. If an app or a command requires elevation, they'll need administrative credentials to complete the task.
Usually, it's recommended to use an account with standard privileges as it offers a more secure environment. However, depending on the situation, it may be necessary to change the account type from Standard User to Administrator (or in reverse), and Windows 10 includes multiple ways to complete the process using Settings, Control Panel, User Accounts, PowerShell, and Command Prompt.
In this Windows 10 guide, we'll walk you through virtually every method that you can use to change the account type on your device.
Quick tip: If you're looking to make your primary account standard, it's best to create a new administrator account first, and then use the new account to change your old account to standard and make administrative changes.
How to change user account type using Settings
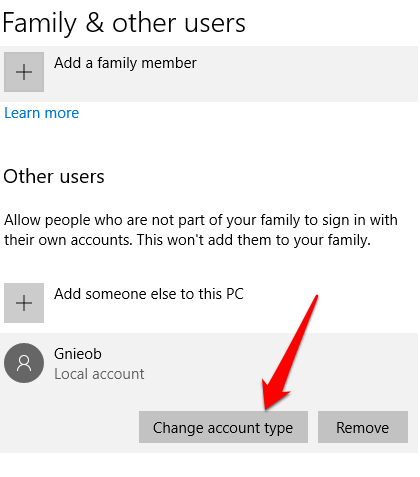
To change the account type with Settings, use these steps:
Click the Change account type button.
 Source: Windows Central
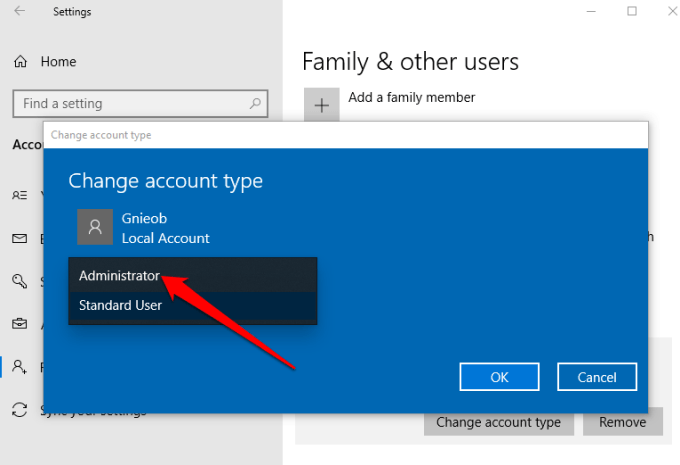
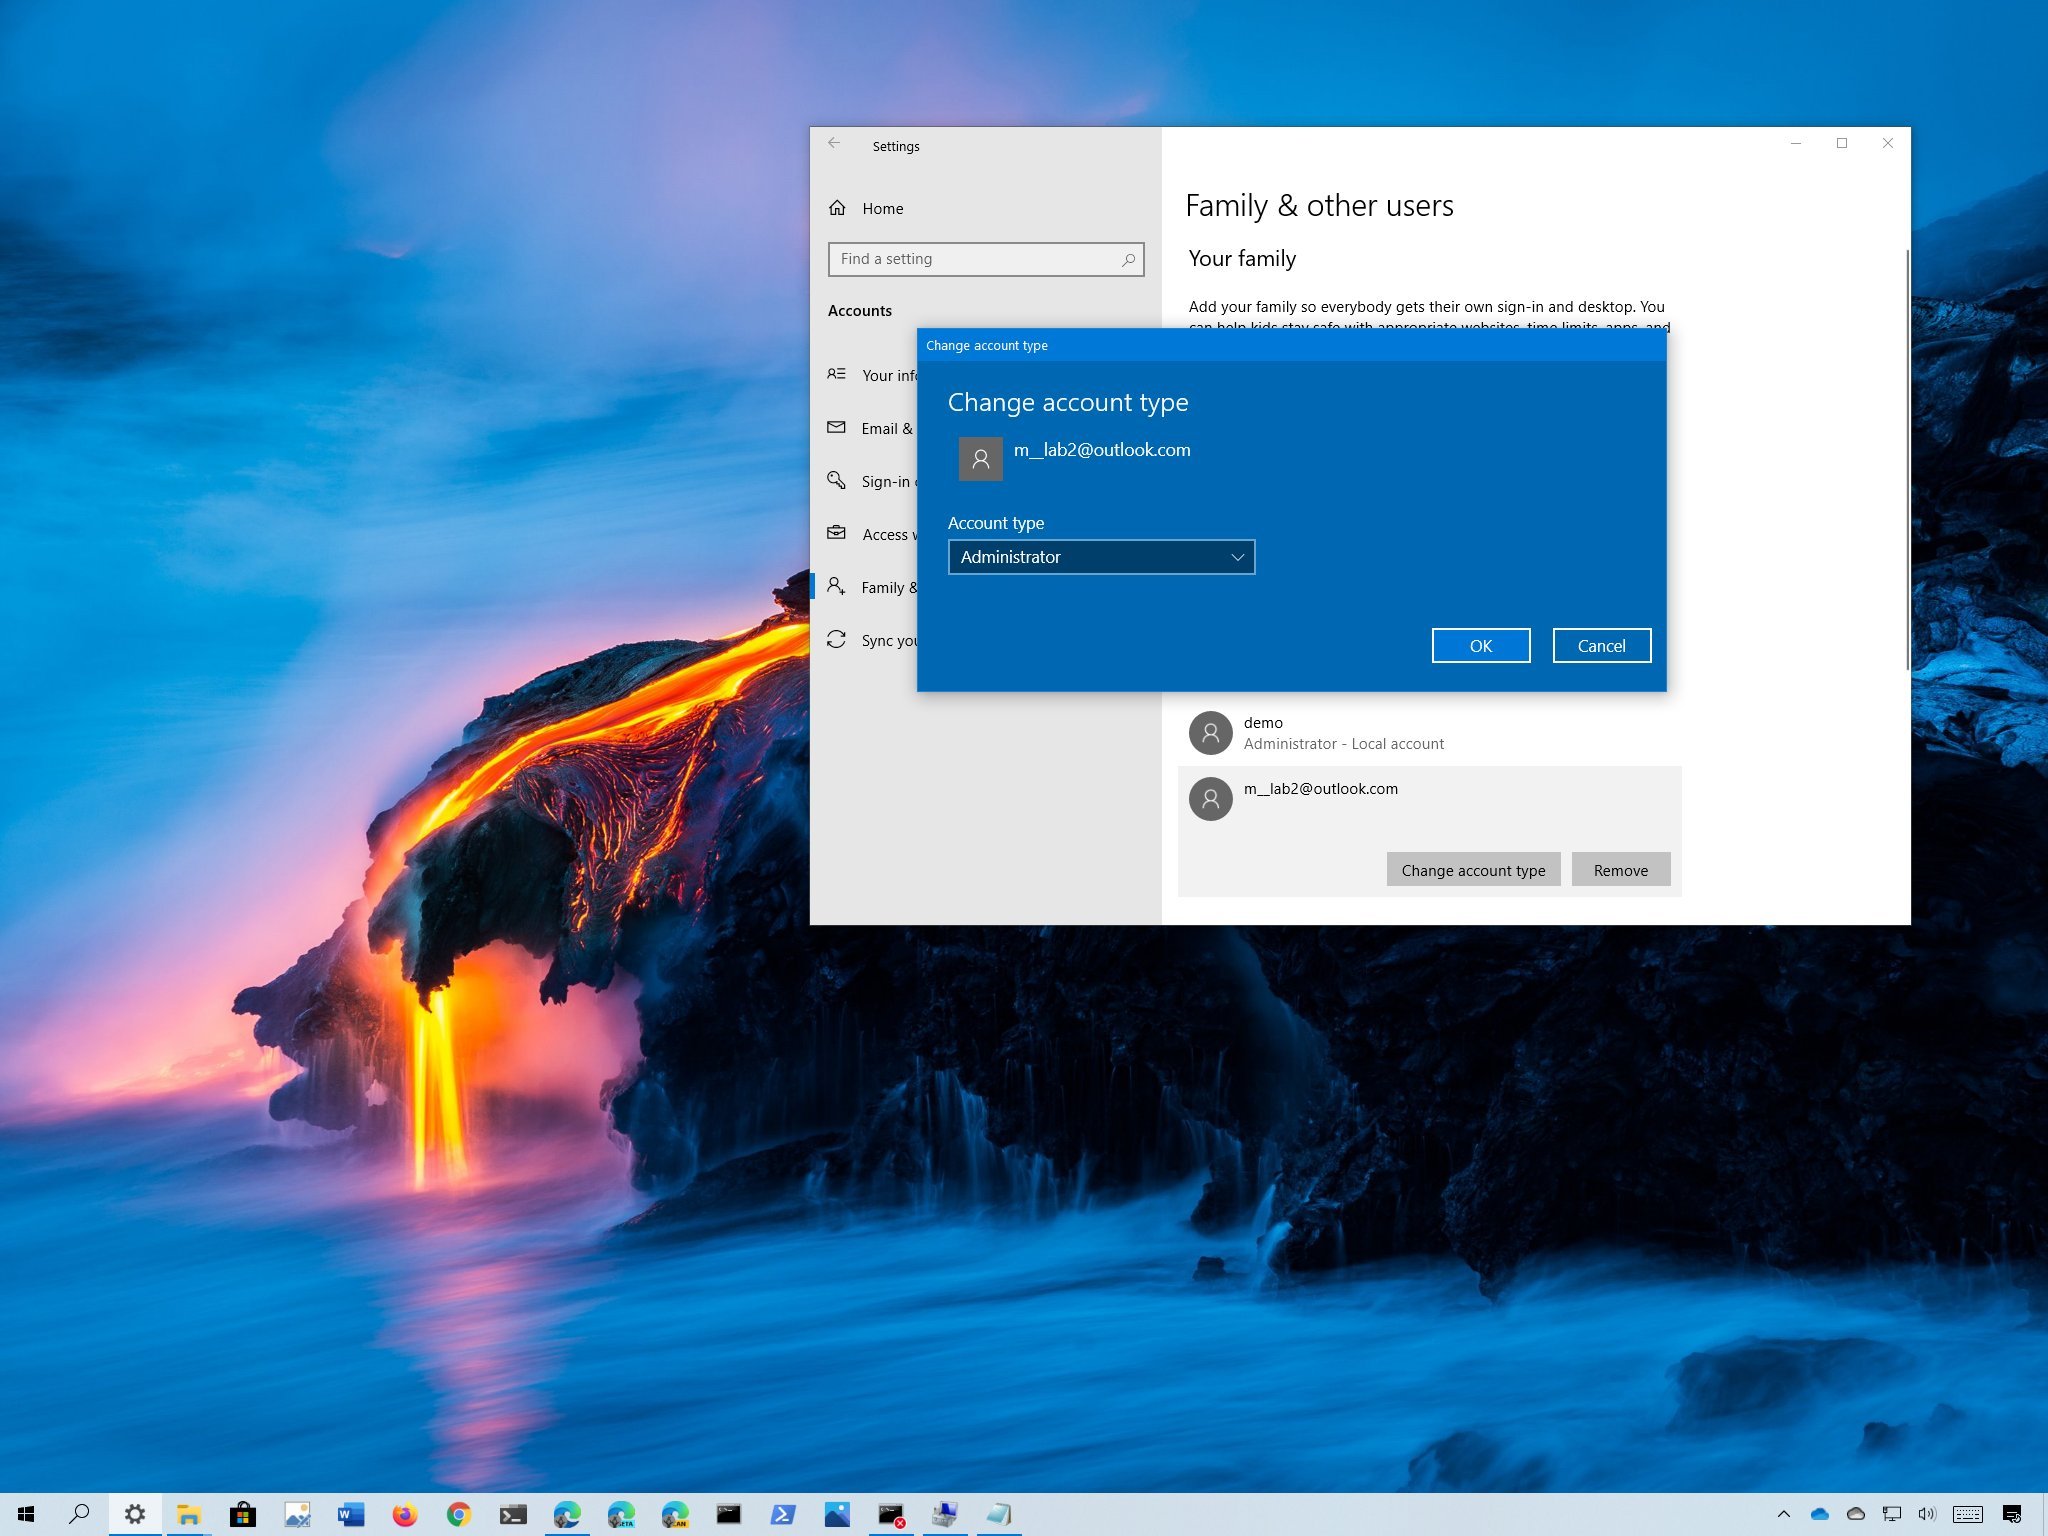
Select the Administrator or Standard User account type.
 Source: Windows Central
Once you complete the steps, restart your computer to start using the account with the new privilege level.
How to change user account type using User Accounts
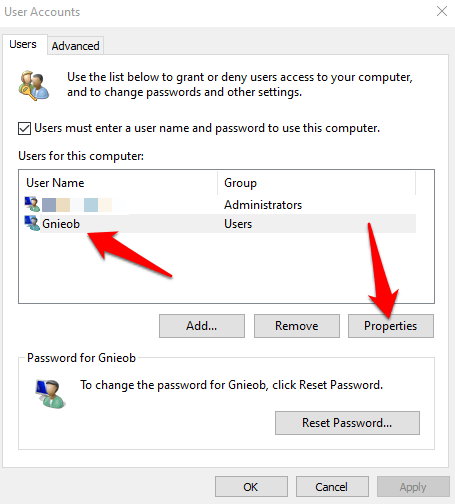
To set an account to Standard user or Administrator type using User Accounts (netplwiz), use these steps:
Click the Properties button.
 Source: Windows Central
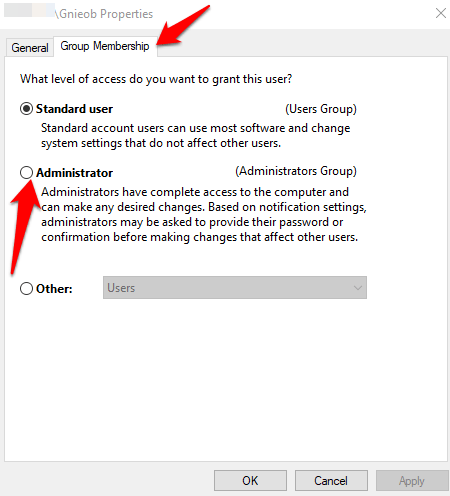
Select the Standard user or Administrator account type depending on your requirements.
Source: Windows Central
Quick tip: You can also select the Other membership option, which allows you to choose different user groups, such as Power Users, Backup Operators, Remote Desktop Users, etc.
Once you complete the steps, restart the device to apply the changes and start using the new account type on Windows 10.
How to change user account type using Control Panel
To change an account type using Control Panel, use these steps:
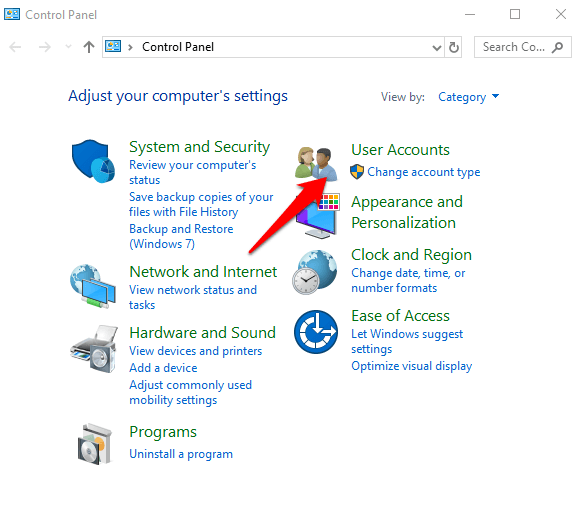
Under the «User Accounts» section, click the Change account type option.
Source: Windows Central
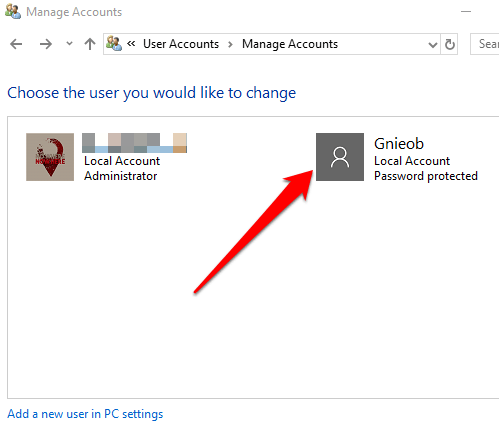
Select the account that you want to change.
Source: Windows Central
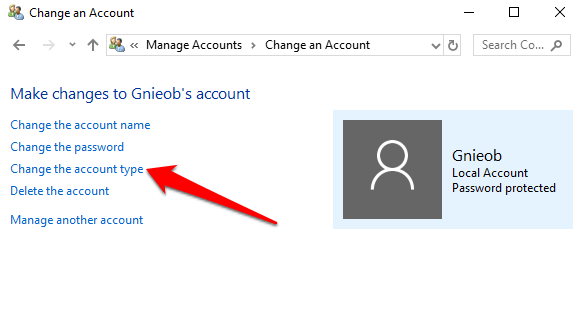
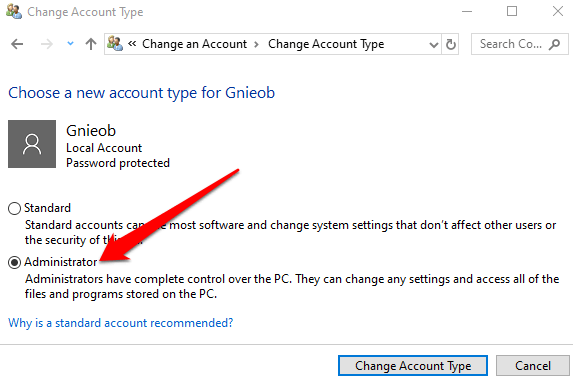
Click the Change the account type option.
Source: Windows Central
Select either Standard or Administrator as required.
Source: Windows Central
After you complete the steps, the next time the user signs in to the account, it'll be limited to the permissions allowed by the user group that you specified.
How to change user account type using PowerShell
To change a Windows 10 account type with PowerShell, use these steps:
Type the following command to change the account type to «Standard User» and press Enter:
Source: Windows Central
In the command, make sure to change the ACCOUNT-NAME for the actual name of the account that you want to change. If you're trying to change an account using a Microsoft account, then the account name would be the first five letters of the email address.
Type the following command to change the account type to «Administrator» and press Enter:
 Source: Windows Central
In the command, make sure to change the ACCOUNT-NAME for the actual name of the account that you want to change.
Quick note: Users with administrator accounts are part of both, the «Administrators» and «Users» groups. As a result, to make a user standard, you only need to remove the user from the «Administrators» group.
After you complete the steps, the account type will switch to the Administrator or Standard group depending on your configuration.
How to change user account type using Command Prompt
To switch account types with Command Prompt, use these steps:
Type the following command to change the account type to Standard User and press Enter:
net localgroup Administrators «ACCOUNT-NAME» /delete
Source: Windows Central
In the command, make sure to change the ACCOUNT-NAME for the actual name of the account that you want to change. If you're trying to change an account using a Microsoft account, then the account name would be the first five letters of the email address.
Type the following command to change the account type to Administrator and press Enter:
net localgroup Administrators «ACCOUNT-NAME» /add
Source: Windows Central
In the command, make sure to change the ACCOUNT-NAME for the actual name of the account that you want to change.
Type the following command view the account type and press Enter:
net user ACCOUNT-NAME
Source: Windows Central
Once you complete the steps, the next time the user signs in to the device, the account will load with the privileges allowed by the group that you specified in the command.
More Windows 10 resources
For more helpful articles, coverage, and answers to common questions about Windows 10, visit the following resources:
![]()
Expect new content for Age of Empires 2 and 3 Definitive Editions soon
Microsoft and its studio partners aren't letting Age of Empires fade away. New content for Age of Empires 2 and 3 DE is planned, some sooner than later.
![]()
Age of Empires 4 devs talk about their vision of a true Age 2 successor
We now have a whole lot more information about Age of Empires 4, and we sat down with three developers to further discuss some of the details about the next big RTS game.
![]()
Review: HP ENVY 14 brings premium features to a fantastic creator's laptop
![]()
These are the best PC sticks when you're on the move
Instant computer — just add a screen. That's the general idea behind the ultra-portable PC, but it can be hard to know which one you want. Relax, we have you covered!
Источник
How to Change Administrator Name on Windows 10
Affiliate Disclosure
If you buy a product via some of the links in this post, as an Amazon Associate www.itechguides.com earns from qualifying purchases.
Expand "Browse Post Topics" below to go straight to a topic.
Browse Post Topics
How to Change Administrator Name on Windows 10 from Computer Management
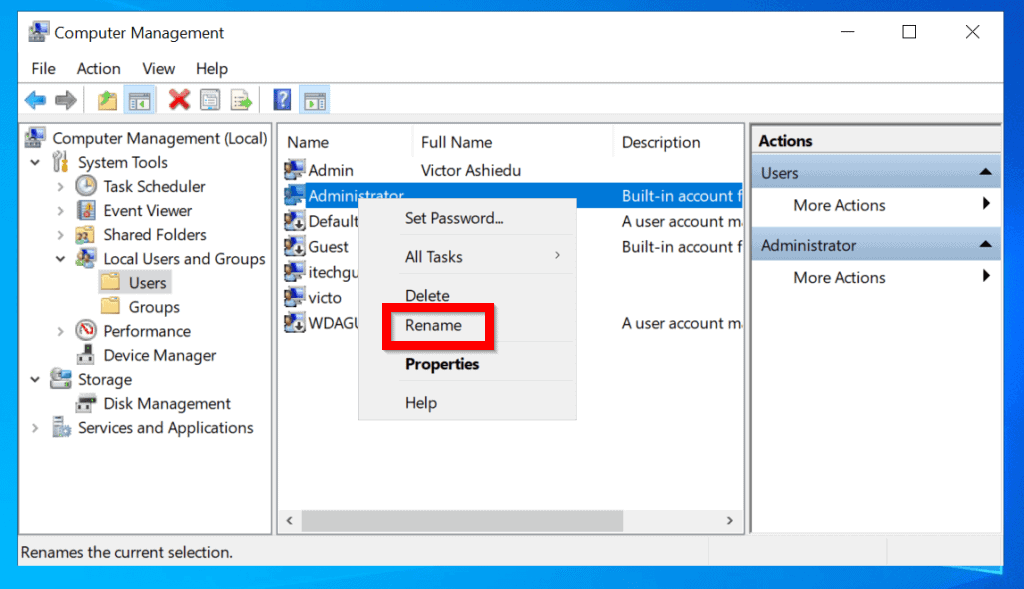
One of the fastest ways to rename the Administrator account is via Computer Management. Here are the detailed steps:
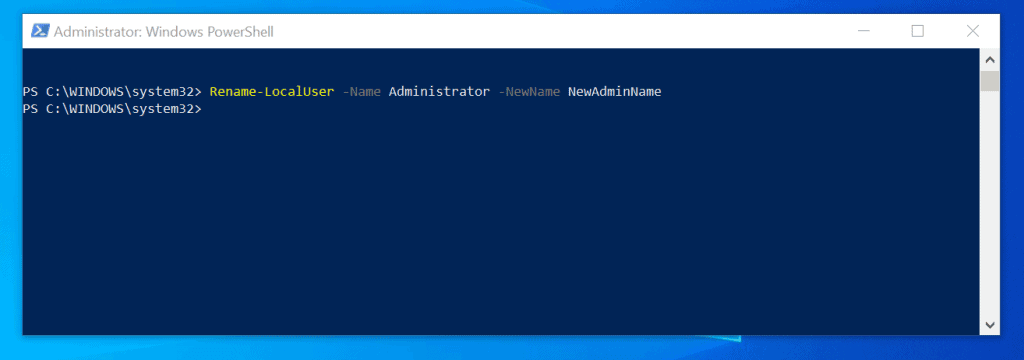
How to Change Administrator Name on Windows 10 with Command Prompt
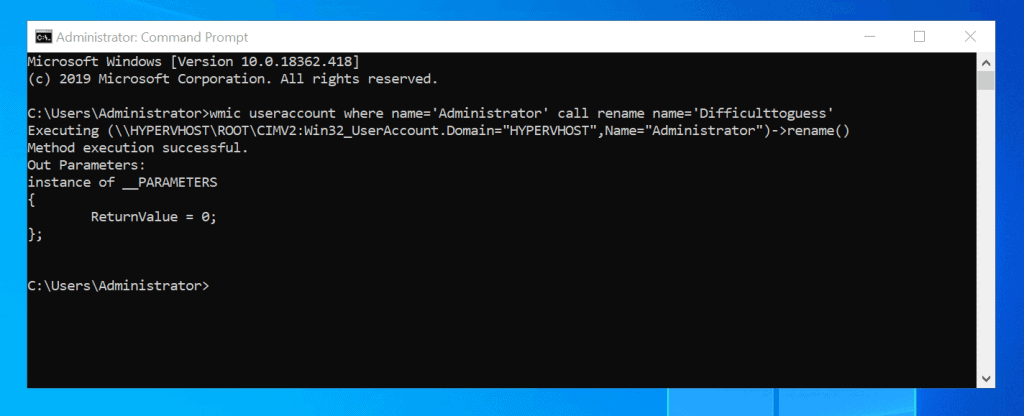
Windows Sys Admins may want to use command prompt to rename a local administrator account. Here are the steps to use this method:
Before you run the command, change newAdministratorName to the new name you want to give the Administrator account.
For my demo, I used the command below
Here is the result in command prompt…
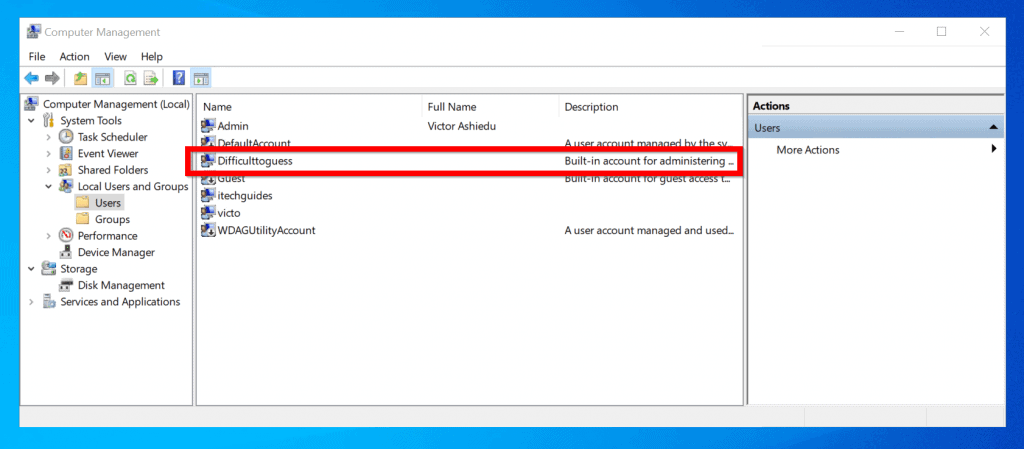
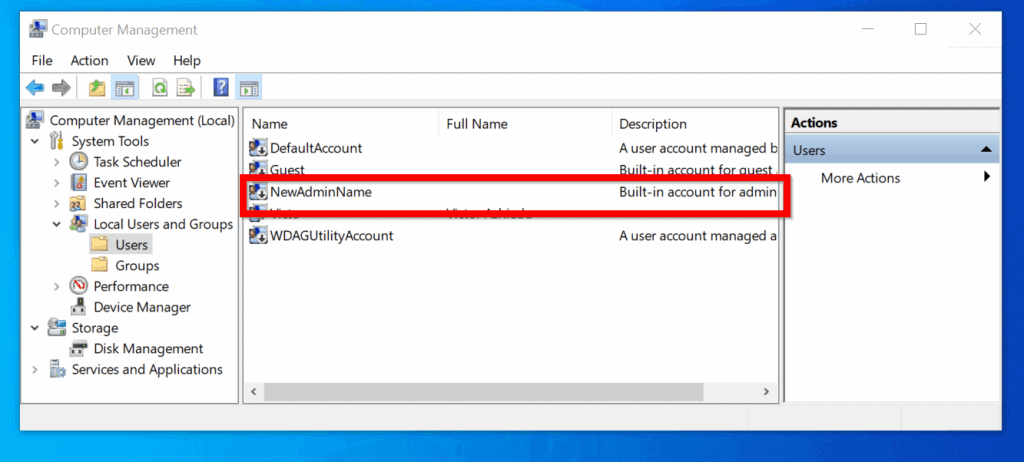
To confirm that the account was renamed successfully, check Local Users and Groups in Computer Management.
How to Change Administrator Name on Windows 10 with PowerShell
You can also use PowerShell to change the name of the Administrator account.
Here are the steps…
This will display details of all local users in your PC. Note the name of the "Built-in account for administering the computer/domain".
Change NewAdminName to the new name you want to change administrator name to..
Here is the command in PowerShell.
The command completes and it appears that nothing changed. To confirm that the name of administrator changed successfully open Local Users and Groups in Computer Management.
How to Change Administrator Name on Windows 10 with Group Policy
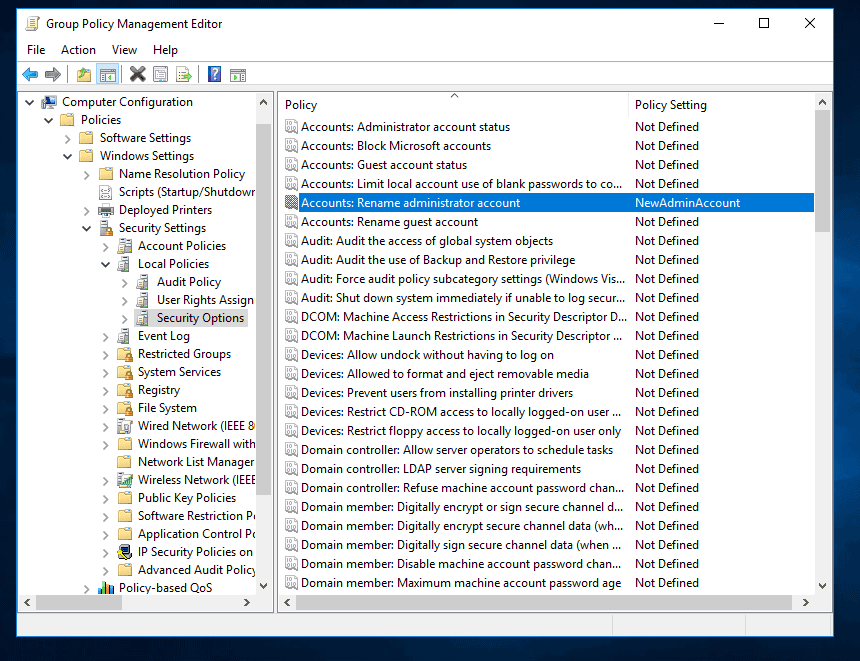
This method is very useful for Sys Admins that want to change local administrator account name in all domain-joined computers.
There are 3 high-level tasks in this method:
The steps for the first 2 tasks are not covered in this guide. For the detailed steps click the hyperlinks.
Below are the detailed steps to configure a GPO to rename local administrator.
You should be able to change administrator name in Windows 10 with one of the methods discussed in this guide.
Have a question, feedback or comment? Use the "Leave a Reply" form found at the end of this page.
Want more Windows guides? Visit our Windows How-To page.
Источник
How to Change the Administrator Name in Windows 10
Rename your Microsoft admin login name
:max_bytes(150000):strip_icc()/tim-fisher-5820c8345f9b581c0b5a63cf.jpg)
What to Know
This article describes how to change the built-in Administrator account name in Windows 10 to bolster your computer's security. We'll also look at how to change the name of other accounts that have admin privileges.
Use one of these first three methods if you're changing the built-in Administrator account name. The last method works only for regular accounts that have admin rights.
Local Security Policy
This is the quickest method, even if you've never heard of or used this part of Windows. There's a policy called Accounts: Rename administrator account that's easy to edit.
Open the Run dialog box with the Win+R keyboard shortcut.
Type this and then choose OK:
:max_bytes(150000):strip_icc()/001-how-tochange-the-administrator-name-in-windows-10-fd02b930d4c444b9a3d8eb075341ff23.jpg)
Go to Local Policies > Security Options and double-click Accounts: Rename administrator account.
:max_bytes(150000):strip_icc()/002-how-tochange-the-administrator-name-in-windows-10-397896cee5f443f6a61154c37b382d4b.jpg)
Enter a new name and then select OK. You can now close out of the Local Security Policy window.
:max_bytes(150000):strip_icc()/003-how-tochange-the-administrator-name-in-windows-10-58ad92070d6d4c599e76b8b1a5eb9f2b.jpg)
Computer Management
The Power User Menu provides access to Computer Management, the next best way to change the Administrator account name.
Right-click the Start button or press Win+X, and choose Computer Management from the menu.
:max_bytes(150000):strip_icc()/004-how-tochange-the-administrator-name-in-windows-10-49e95a01abdb4d3d9da92d62d85c239a.jpg)
From the left panel, open System Tools > Local Users and Groups > Users.
:max_bytes(150000):strip_icc()/005-how-tochange-the-administrator-name-in-windows-10-ef8452e8fa1d4bfeabef47bc69de50d1.jpg)
You might not see this screen depending on your edition of Windows 10. Use the Command Prompt method below instead.
Right-click Administrator from the right side and choose Rename. This is the same way you can rename other accounts.
:max_bytes(150000):strip_icc()/006-how-tochange-the-administrator-name-in-windows-10-5e55f8390f45440697f2cff893b8ce9f.jpg)
Enter a new name and then press Enter. You can now exit Computer Management.
:max_bytes(150000):strip_icc()/007-how-tochange-the-administrator-name-in-windows-10-b8e2a89b935e46e0b12e1672a16ff635.jpg)
Command Prompt
You can also use the powerful Command Prompt. It isn't as straightforward as the methods described above because you have to type out a particular command for it to work.
Here's exactly how it's done:
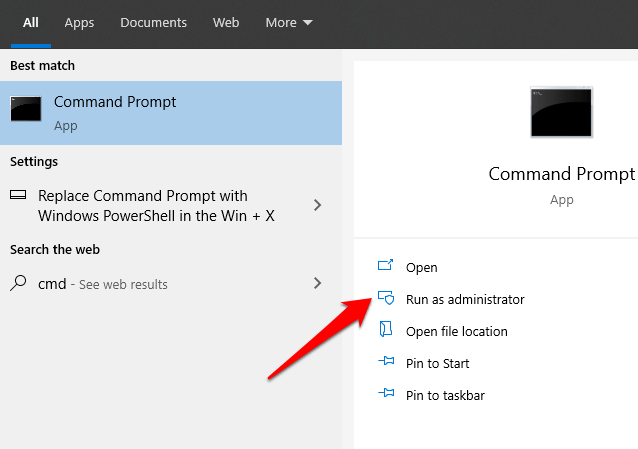
Open Command Prompt as admin. The fastest method is to search for cmd from the search bar, right-click the result, and select Run as administrator.
Type this, changing NewName to the name you want to use:
:max_bytes(150000):strip_icc()/008-how-tochange-the-administrator-name-in-windows-10-826f84898049476db94cb57ca395f008.jpg)
Press Enter to submit the command. You'll know it ran correctly if you see a Method execution successful message. You can now exit Command Prompt.
Control Panel
If you do not want to change the name for the built-in Administrator account but instead just a user with admin privileges (or even one without), it's much easier through Control Panel.
Open Control Panel. The quickest way to find it is to type Control Panel in the search bar near the Start button.
:max_bytes(150000):strip_icc()/009-how-tochange-the-administrator-name-in-windows-10-d5d48fff5c5b43ac8ee95d1f7dcbef12.jpg)
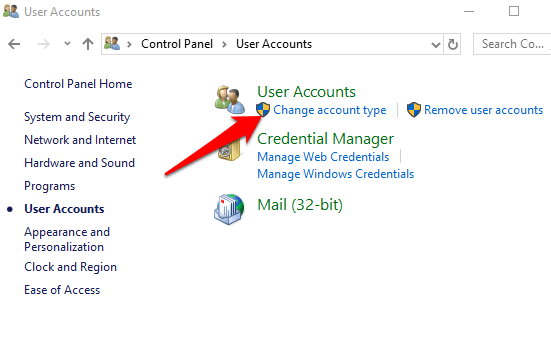
Select User Accounts. If you see it again on the next screen, choose User Accounts once more.
:max_bytes(150000):strip_icc()/010-how-tochange-the-administrator-name-in-windows-10-85aca21a0f9d4503a11aa7a31ed26456.jpg)
Select Change your account name.
:max_bytes(150000):strip_icc()/011-how-tochange-the-administrator-name-in-windows-10-a966488012b6455bafeecdb4878f1cea.jpg)
Don't see it? You're using your Microsoft account to log in, so you'll need to change the name from your profile page on Microsoft's website instead of following these steps.
To change the account name for a different user (it won't work for the built-in Administrator account), select Manage another account, choose the account, and select Change the account name.
Enter a new name in the box provided.
Select Change Name. You can now exit the window.
:max_bytes(150000):strip_icc()/012-how-tochange-the-administrator-name-in-windows-10-6ceec74ac7cb422c92e5bfc317cb4b11.jpg)
Why Change the Administrator Account Name?
Changing the account name is like changing the password. It prevents hackers from succeeding if their automatic password-breaking tools assume the default name hasn't been changed.
As the name explains, the built-in Administrator account has administrative rights. You can use it to install programs and make extensive system changes. It's useful for those reasons, which is why some people choose to use it.
However, it's disabled by default, so using it requires you to enable the admin account manually. It's not entirely necessary, though, because you can convert any user account to one with admin rights; it's pretty easy to create and delete accounts in Windows 10.
Nevertheless, if you've chosen to keep the built-in Administrator account enabled, it's important to assign it a strong password and change its name. «Administrator» is chosen by default, so anyone with access to your computer knows right away that unless you've changed the account name, they can guess passwords using that username.
Источник
How to Change the Administrator on Windows 10
Source: https://pocomp.ru/how-to-change-administrator-in-windows-10/